
This past weekend Missy Moo celebrated her 9th birthday with a sleepover at my parents' cottage. I know, right! How could my baby girl be nine years old already?!? I must have been a child bride. Anyway, she invited four of her friends and we had planned a campfire, some crafts, a movie, a ride in the trailer behind the riding lawnmower, a hike ... Lots to do in an 18 hour period. Brad and I had a goal to tire them out so they sleep. :)
Unfortunately Mother Nature had other plans for our party. She nixed the trailer ride, hike and s'mores over an open campfire idea with some pretty good wind and rain. We then planned to do the s'mores using the wood fireplace in the cottage after supper but after seeing the energetic reaction the girls had after eating this sugary cake (and knowing that the girls weren't totally gung ho on the s'mores) we opted out of the treat.
We had good reason to nix the extra sugary treat and it mainly had to do with our sanity. See, about 2 minutes after the girls had eaten this 'groovy jeans' cake the sugar in said cake kicked in. Like 'kick you in the face with a snow boot', kicked in. O-M-G! I have two boys so I know how energized kids can get. Well, these 4 little girls broke the sugar-rushability scale in time and intensity. Brad and I just looked at each other with stunned expressions and got out of the way while the girls got rid of their energy sock sliding, running around, pillow fighting ....
Once they began to morph back into their human forms again we decided to do a craft. After being blown away by the screamed "YAH!" response to me asking if they wanted to craft (and wondering WHY in God's green earth I was going to put paint into the hands of these still hyper girls) we got to work on the craft.
Ok, this may seem like a little bit of a lame 'craft' but the girls LOVED it! Before the rain/wind hit we had gone for a walk along the lake and picked out various cool looking rocks and snail shells for our craft. Oh yes, I'm sure you are all amazed at the intricate craft I had planned. Painting up some rocks and the old homes of slimy snails. The girls LOVED it. Good to know that I don't have to go all fancy-schmancy all the time.
When they had finished the craft, the girls got a second wind and decided to play air hockey, foosball and flashlight hide-and-seek. At this point Brad and I had the energy of a pair of geriatric tree slugs so we herded the girls into the bedrooms to get into their PJs and put on "Despicable Me" (or as Missy Moo calls it "Despicital Me") to bring the energy level down before bedtime. {I honestly love this movie. If you haven't watched it yet I highly recommend it.}
As the movie was finishing up Brad and I could see the end of the day nearing and were looking forward to sitting in front of the fire and relaxing. It was going on 10pm, after all. We figured that the girls would chat in bed for a half hour and then drift off into a peaceful sleep. Ha! We were totally deluded. One of the girls fell fast asleep but the other three (including Missy Moo) were up until midnight. I shuddered to think of the whinefest we (and the other parents -- sorry!) were in for on Sunday and Monday with Missy Moo because as we all know whine is the gift that keeps on givin'.
Ok enough blathering. Here's the reason for this post. The cake! Not to toot my own horn but one of the hits of the par-tay was my cake. {insert a wee toot here} Originally I had asked Missy Moo what cake design she wanted for her party. Knowing that I had surprised Boy 2 with his Karate Gi Cake back in July she wanted to be surprised with her cake too. Um, ok. The only problem was I had no idea what to make. I was fresh out of ideas. And knowing how much she loved her Purse Cake last year I knew I had to bring my A game.
I knew that she wanted to watch the movie "Despicable Me" at her party so I tried to come up with a cake design of one of the minions but just couldn't find anything that looked appetizing or that my meagre skill set could accomplish. I know that Missy Moo is girly but she's not overly frilly, if you know what I mean. So, I knew that I wanted something girly, something tweenish and a design that would impress. When I saw the design for the Groovy Jeans Cake on the Betty Crocker website I knew I had my cake design. Who among us doesn't love a pair of comfy jeans, I ask you??
I'm going to write out my directions for the cake but I fear that it is a little convoluted. If you prefer you can click on the link below and go to the Betty Crocker site where they have a great video which details how to cut the cake as well as frost/decorate it.
Groovy Jeans Cake
1 box of Betty Crocker SuperMoist cake mix (I used French Vanilla)
water, oil and eggs called for on the cake mix box
2 containers of Betty Crocker 'Rich and Creamy' vanilla frosting
yellow and blue food colours (I used a combo of Wilton paste and liquid food colourings)
1 package of candy fruit roll
various candies/gummies to decorate
Line a cake board with foil and tape the foil at the back of the board to secure it.
Note: My hubby cut me out a cake board from very dense (but not overly thick) fibre board and it works like a charm. Make sure it's not so big that you can't fit it into the fridge!
Place a strip of parchment paper over the narrow width of a 9x13-inch baking pan. You can use the overhanging parchment on both sides of the pan to help get the cake out once it's cooled. Grease and lightly flour the parchment as well as the baking pan not covered by the parchment paper. Set aside.
Combine cake mix, water oil and eggs according to the cake mix instructions. Gently pour batter into the prepared pan ensuring that the batter gets into the corners of your pan nicely. Bake according to package directions.
Allow cake to cool in the pan for 10 minutes on a wire rack. Run a knife around the edges of the cake to loosen it from the pan. VERY carefully remove cake from the pan and set it gently on your cake board.
While your cake is cooling, tint your icing. This is where you just have to just wing it. The colour of your 'jeans' all depends on how much icing tint you're using. I love Wilton paste tints but since they are not peanut-safe I usually can't use them. BUT, since our boys were on a Scout hike all weekend and wouldn't be partaking in this cake I pulled out my tints and went to town.
Remove 1/3 of a cup of the vanilla icing and place it in a small bowl. This will be tinted yellow for the jean stitching. Start with a teeny amount of food colouring. Once it's mixed and the colour you like, you can get it ready to pipe on. If you'd like a really easy and cheap way to pipe on your yellow stitching just use a sandwich Ziploc bag. In order to put the icing into the bag without getting it all over your hands put the Ziploc into a glass and pull the bag over the edges of the cup. Spoon in your icing, zip up the bag and voila! All the icing is in the bag. Now just cut a very small bit off one corner of the bag. Twist the bag and your yellow icing is good to go.
Remove the remainder of the vanilla frosting from its original containers and place it into a medium bowl and tint it with blue frosting tint. Start with a very small bit of tint. I'm talking half of an eraser head on a pencil. This stuff is concentrated! You can always add more if it's too light!
Now that your cake has had time to cool it's time to cut it. First we want to get rid of the hump on the middle of your cake and make it flat. Mine didn't have one so I skipped this step. Just take a long bread knife and slice off the hump. Turn your cake over so the underside is showing. Now you're ready to make your jeans.
If you'd like a very clear and easily explained way to do the cutting for this cake please visit the Betty Crocker site HERE and watch the video. If you'd like to read my potentially convoluted explanations on how to do this continue reading.
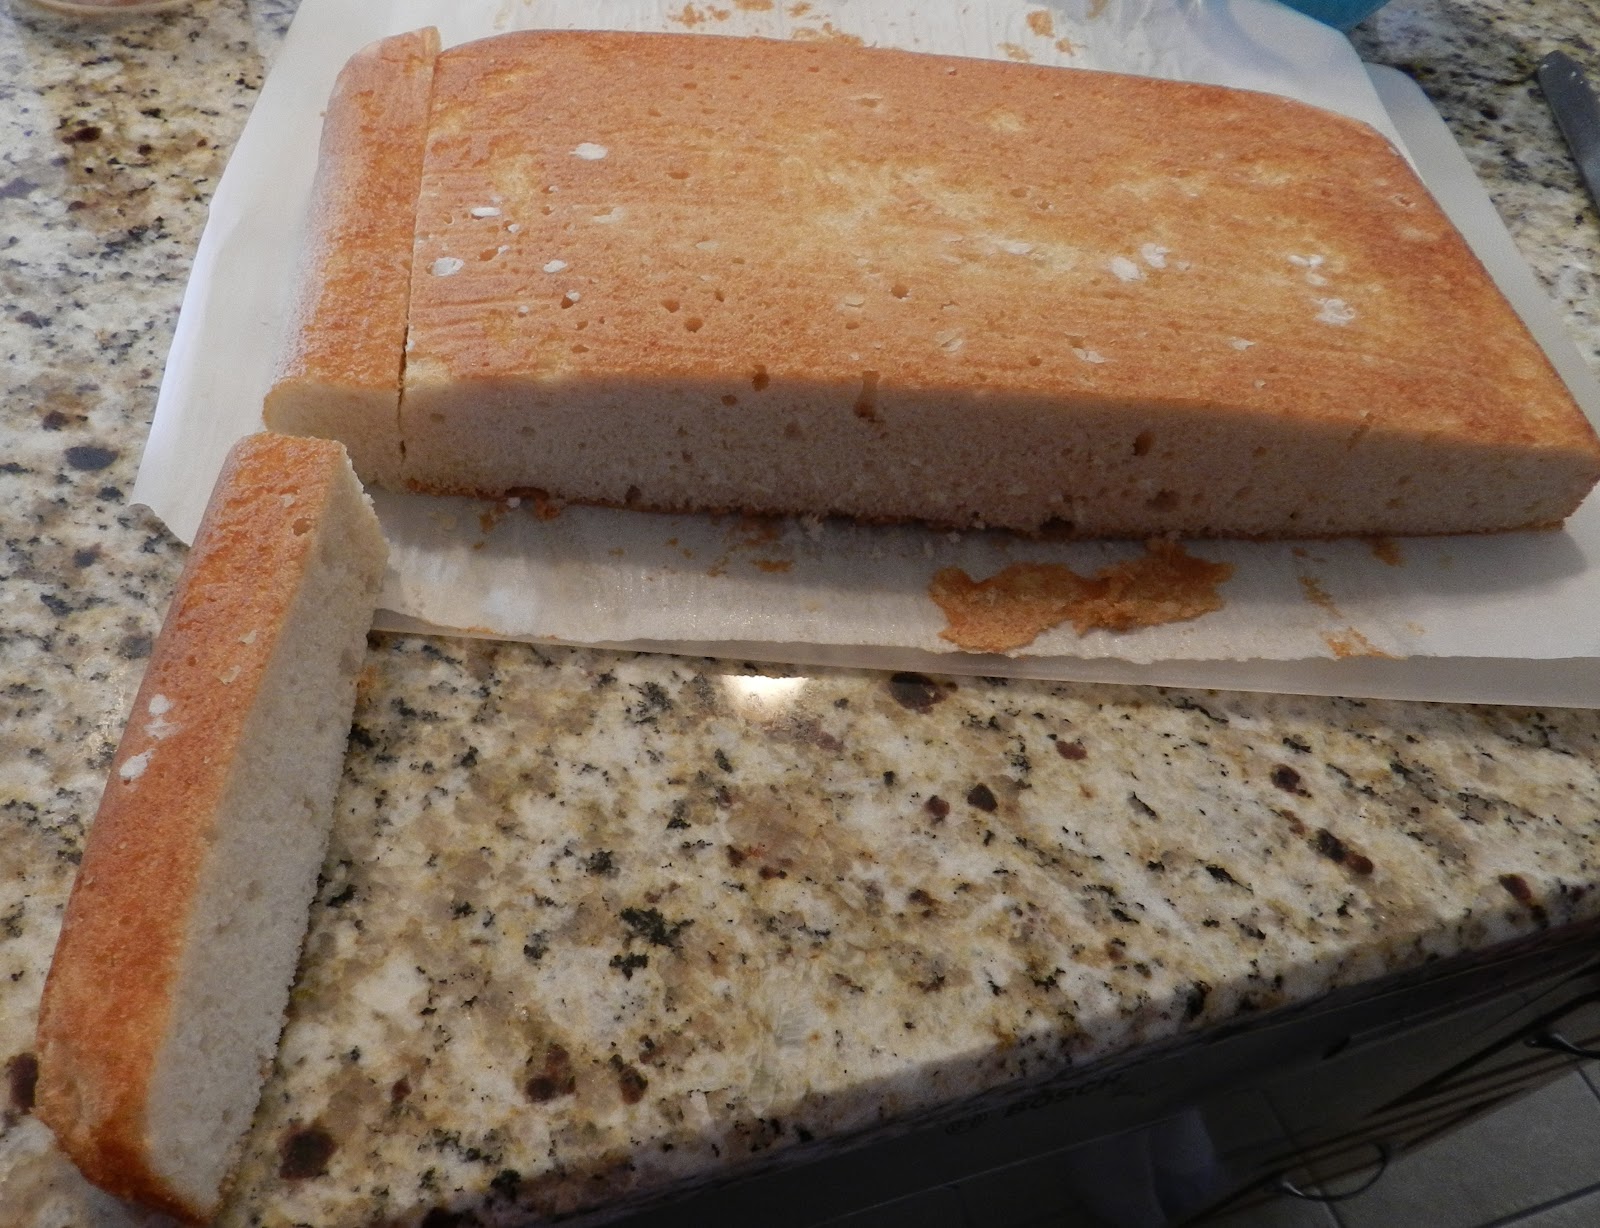
Here's a picture of how I started to make my jeans. First, cut about 1 1/2-inches off one of the longer edges of the cake and set it to the side carefully. Take this piece and place it at the narrow end of your cake (ie. the waist of your jeans).
Place toothpicks where you'd like your (pardon the nasty word) crotch and the inner edges of your pant hems. This will make cutting a lot easier. Cut the inner 'crotch' triangle in half. We'll use these to make our jeans flare a bit.

As you can see below, I got a little cocky moving my cake around and one of the legs of my jeans broke in half.

At this point, unless you have the steady hands of a surgeon, you may want to put a narrow strip of parchment paper just under the edges of your cake. This way, if you happen to get some icing on your cake board it will land on the parchment instead of your nice, clean foil.
Once your cake has been cut into the appropriate pieces you can start putting the cake together and using frosting to 'glue' them together. Take the two inner triangles that you cut out from the 'crotchal' area and place them on the outer edge of your pant legs to make them flare a bit. (sorry I forgot to take a pic here. Check the Betty Crocker site if you're confused with my explanation). Glue these pieces on with frosting.
Now it's time to put it in the fridge for 30-40 minutes. Cooling the cake makes a big difference in how frustrated you're going to get. A more dense and cool cake is much easier to frost than a soft, smooshy one. Trust me.
Once your cake is nice and cool it's time to do the all important 'crumb coat'. This is the very thin layer of icing that will seal in all those pesky crumbs from the cut edges of your cake. Don't skip this step. If you don't do this you'll be fighting the crumbs the whole way and wondering what you were thinking when you decided to bake this blasted cake. Again, trust me.
Crumb coat done, put the cake back into the fridge for another 30-60 minutes to firm up the crumb coat. Once that's done it's time to do the final frosting coat. Frost the cake with the remaining blue icing (I had about 1 cup leftover after I was done). Remove the narrow strips of parchment paper (if you used them to catch excess frosting).
Using the serrated edge of a regular kitchen knife I lightly dragged it across the blue icing to create the jean effect (you may not be able to see it in the picture). Cut the fruit roll-up/candy leather to make the belt and decorate the cake with various candies to make it 'groovy'. Using your baggy of yellow frosting pipe on the stitching for your jeans by making short little lines for the pockets, the fly, the stitching for your patch and the bottom edges of the pant legs.
Last step: Enjoy!
Recipe from: Betty Crocker's 'Groovy Jeans Cake'

No comments:
Post a Comment
Comments totally make my day!! I read each and every one and really try to reply to all messages posted. Thanks for stopping by my blog!